Paper Cone Wreath: A Rolled Paper Starburst for Walls
Roll paper squares into cones and glue them in two rounds onto a cardboard circle to make a light starburst wreath for an indoor wall.

Tutorial at a glance
Materials
- About 30 paper squares, 5 in (12.5 cm) each, plus spares
- Cardboard circle about 8 in (20 cm) across
- Glue stick or white craft glue for seams
- Hot glue gun or thick craft glue
- Paper strip about 1.5 x 12 in (4 x 30 cm) for the rosette
- Scissors, pencil and ruler
- Twine or narrow ribbon for the hanging loop
A paper cone wreath is a flat cardboard circle covered with rolled paper cones that fan out from the middle like a starburst. It needs no wreath base from a shop, only paper, glue and a piece of a cardboard box, and the whole design is one shape repeated until the circle is full.
This version uses squares of about 5 in (12.5 cm) glued in two rounds onto a cardboard circle about 8 in (20 cm) across. Because the cones reach well past the edge of the card, the finished wreath measures about 15 in (38 cm) across. It is a wall piece for indoors: paper softens in damp air and should hang nowhere near a flame or a heat source.
What You Need
- About 30 paper squares, 5 in (12.5 cm) on each side, plus a few spares
- A cardboard circle about 8 in (20 cm) across, cut from a box
- A glue stick or white craft glue for the seams
- A hot glue gun, or thick craft glue, for fixing cones to the card
- Scissors, a pencil and a ruler
- A strip of colored paper for the center rosette, about 1.5 x 12 in (4 x 30 cm)
- Twine or narrow ribbon for a hanging loop
Choosing the Paper
Almost any paper that rolls without cracking will work: plain paper, kraft paper, or pages from a worn-out book you own. Using a different paper for each round makes the two layers easy to tell apart.
| Paper | How it rolls | Look |
|---|---|---|
| Plain copy paper | Easily, holds a seam well | Crisp and bright |
| Kraft paper | Stiffer, needs firm pressure | Warm and matte |
| Old book pages | Easily, can be brittle | Soft, printed texture |
| Cardstock | Poorly, springs open | Best avoided for cones |
Cut all the squares to the same size before rolling anything. Uneven squares make cones of different lengths, and the outer edge of the wreath then looks ragged instead of round.
Rolling a Cone
Roll two or three practice cones before you start counting.
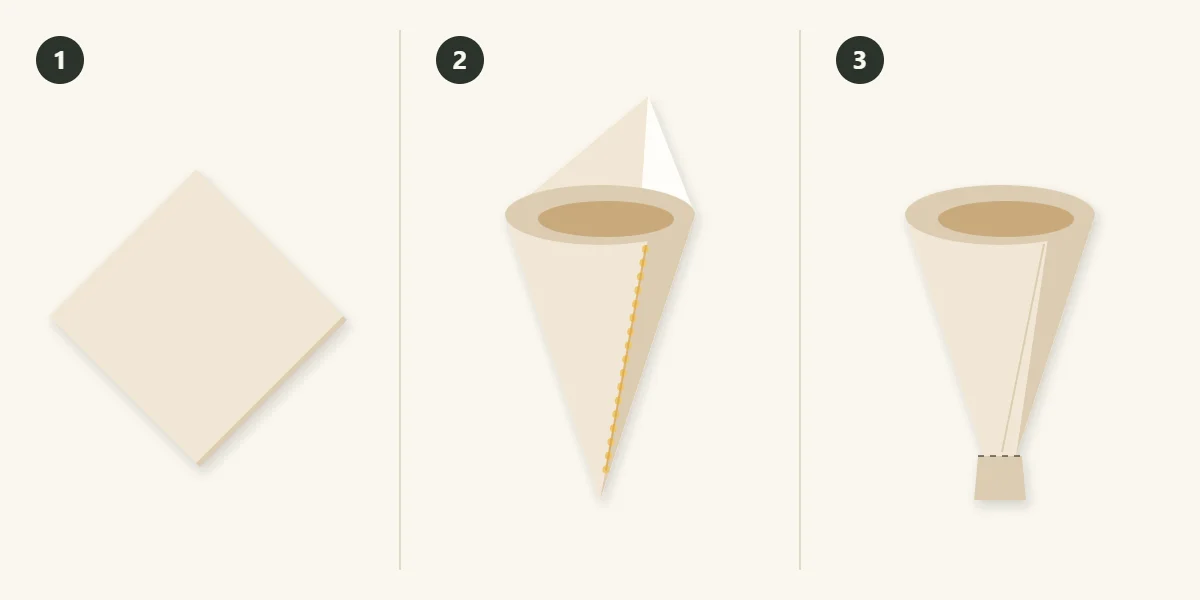
- Lay a paper square on the table turned as a diamond, with one corner pointing toward you.
- Roll the square from one side corner toward the opposite one, keeping the bottom tight and letting the top stay open, until it forms a cone. Run a line of glue along the seam where the last corner overlaps and press until the glue holds.
- Press the pointed end flat between finger and thumb for about 1 in (2.5 cm). A flattened point sits flush on the cardboard and gives the glue something to grip, where a round point rolls sideways.
Aim for an open end about 2 in (5 cm) wide. Narrower cones mean more are needed to fill each round. Stack finished cones inside one another so they keep their shape.
Preparing the Cardboard Circle
Draw around a plate of about 8 in (20 cm) on a flat piece of box cardboard and cut the circle out. Mark the center, then draw a small pencil circle about 3 in (7.5 cm) across around it. That inner line is the guide for the outer round of cones.
Fix the hanging loop now, while the back is easy to reach. Glue both ends of a short length of twine to the back near one edge and cover them with a scrap of card.
Gluing the Rounds
- Outer round. Put glue on the flattened end of a cone and press it onto the card with its point touching the pencil circle and its open end facing outward. Add the next cone right beside it, sides touching. Continue all the way around, which takes about 16 to 18 cones.
- Check the spacing. Before the last four cones go on, lay them in place dry. If the gap is too wide or too narrow, nudge the spacing of those few so the difference is shared out.
- Inner round. Glue the second round on top of the first with the points meeting at the very center of the card. Set each cone over the join between two outer cones so the layers are staggered. About 12 cones fill this round.
- Center. Leave the middle open until every cone is firm, then cover it with the rosette.
Watch out
Hot glue and the tip of the glue gun burn, and thin paper passes the heat straight to your fingers. Press cones down with the handle of a spoon or a folded scrap of card, never with a bare fingertip on fresh glue.
Thick craft glue works too, but each cone has to be held until it stays put. The guide to attaching materials with glue, wire, picks and pins explains when each adhesive suits paper.

Finishing the Center
For a simple rosette, fold the paper strip into narrow accordion pleats, glue the two ends together to make a ring, then press the ring flat so the pleats fan into a disc. Glue a small paper circle on the back to hold it flat, and glue the rosette over the cone points. A plain paper circle about 3 in (7.5 cm) across also works.
Common Problems
- Cones unroll. The seam had too little glue or was released too soon. Re-glue and hold the seam with a paper clip until it is firm.
- Gaps show cardboard. Slip an extra cone into the gap in the inner round, or paint the card a matching color before you start.
- The circle looks lopsided. The cone points drifted off the pencil line. Check every fourth cone against the line as you go.
Hanging and Variations
The wreath is light, so the twine loop will sit on a small nail or a removable adhesive hook used according to the hook maker’s instructions. See how to hang a wreath without nails for options on walls and mirrors. Choose a dry indoor wall out of direct sun, since paper yellows and fades in strong light, and keep it well away from candles, fireplaces, heaters and lamp bulbs.
Tip
For a fuller wreath, add a third round made from smaller squares of about 4 in (10 cm), glued on top with the points at the center.
If you enjoy repeating one paper shape, the paper leaf wreath made from scored cardstock leaves uses the same layering idea on a ring instead of a solid circle.
Frequently asked questions
What paper works best for a paper cone wreath?
Thin to medium paper that rolls without cracking is easiest: copy paper, kraft paper or pages from a worn-out book you own. Cardstock is usually too stiff and springs open at the seam. Whatever you pick, cut every square to the same size so the outer edge stays round.
How many cones does the wreath need?
With 5 in (12.5 cm) squares on an 8 in (20 cm) cardboard circle, the outer round takes about 16 to 18 cones and the inner round about 12. The exact number depends on how wide you roll the open ends, so cut a few spare squares and fill each round until the cones touch.
Can a paper cone wreath hang on an outside door?
It is best kept indoors. Paper softens and warps in damp air and fades in strong sun, and the cones crush easily when a door is opened and closed. Hang it on a dry interior wall, away from candles, heaters and lamp bulbs.