Pinecone Wreath: Wiring Cones onto a Frame
Give each pinecone a wire tail, twist it onto a wire frame in rounds, and lock the cones with hot glue for a dense natural wreath.

Tutorial at a glance
Materials
- 12 in (30 cm) wire frame
- About 20 large and 15 medium dry, open pinecones, plus small ones for filling
- Paddle wire or floral wire
- Wire cutters
- Hot glue gun and glue sticks
- Gloves
- Sturdy wire or ribbon for the hanging loop
The reliable way to build a pinecone wreath is to give every cone its own wire tail and twist it onto the base, then use glue only to lock things in place. Wired cones can be turned, tightened and moved while you work, and they stay attached when the wreath is lifted, which glue alone on a smooth cone often fails to manage.
This project uses a 12 in (30 cm) wire frame and cones in three sizes. Once the cones overhang the frame on both sides, the finished wreath measures about 16 in (41 cm) across. It is heavier than most beginner wreaths, so the hanging loop and the hook matter as much as the arrangement.
What You Need
- A 12 in (30 cm) wire frame (a grapevine base of the same size also works)
- Clean, dry, open pinecones in three sizes: about 20 large, 15 medium and a bowl of small ones
- Paddle wire or floral wire, thin enough to slip between the scales
- Wire cutters
- A hot glue gun and glue sticks
- Gloves, since cone scales are sharp and can be sticky with sap
- Sturdy wire or ribbon for a hanging loop, plus optional ribbon for a bow
The counts are a starting point only. Cones vary a great deal in width, so keep adding until the frame is hidden.
Gathering and Sorting the Cones
Bought cones are usually already clean and fully open. If you gather your own, collect only where you have permission, and pick cones that have fallen, feel dry and have their scales spread. Closed or damp cones will go on opening as they dry indoors, which loosens the wire and shifts the arrangement. Brush off soil and needles, and leave gathered cones spread out in a dry, airy place until they are open and no longer feel cool or damp to the touch.
Then sort them into three piles by size. Sorting first lets you place the big cones evenly and saves the small ones for filling, where they are most useful.
| Cone size | Where it goes | How it is fixed |
|---|---|---|
| Large | Outer round, pointing out | Wire tail |
| Medium | Inner round, pointing in | Wire tail |
| Small | Top layer and gaps | Wire tail or hot glue |
Wiring a Single Cone
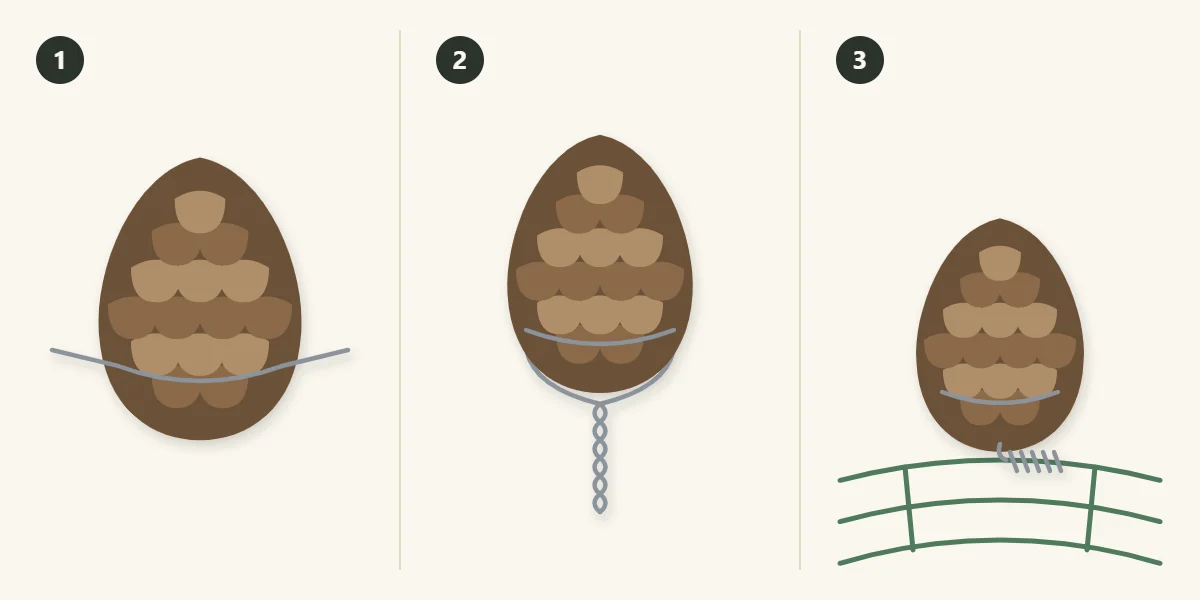
Cut a piece of wire about 10 in (25 cm) long for each cone.
- Pass the wire around the cone inside its lowest row of scales, near the stem end, and pull it down so it disappears between the scales.
- Bring the two ends together under the base of the cone and twist them tightly into a single tail. The cone should not spin on the wire. If it does, twist closer to the cone.
- Hold the cone against the frame and wrap the tail around a frame wire two or three times, pulling it snug.
Cut off the spare wire and bend the sharp end back into the wreath so it cannot scratch a hand or a door. The same wiring method, along with picks and pins, is covered in the guide on how to attach materials to a wreath.
Building in Rounds
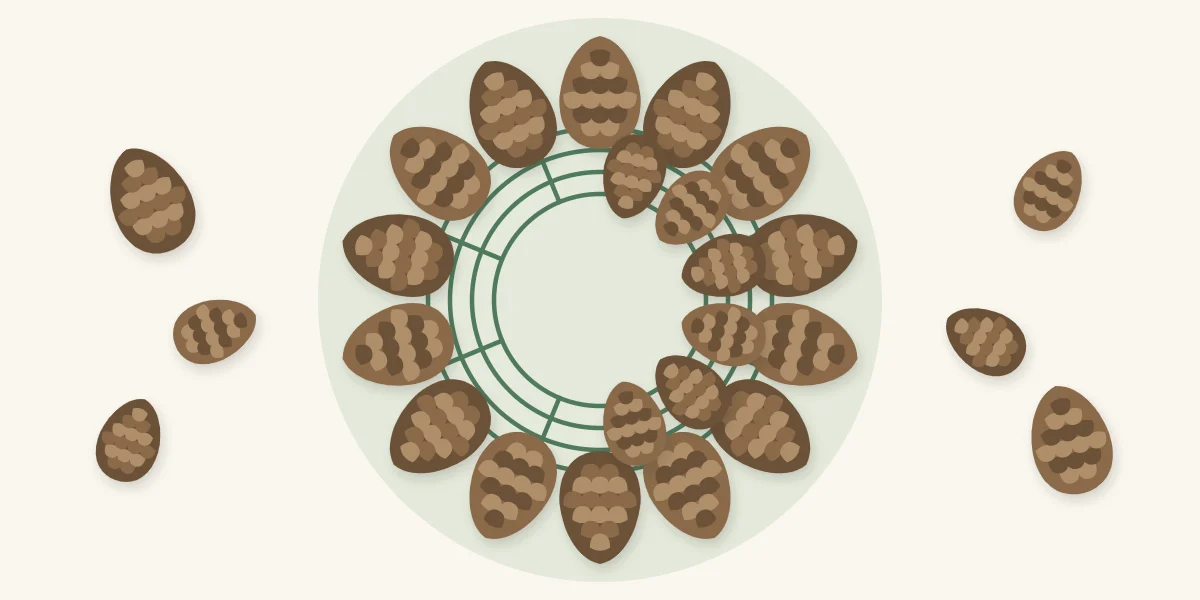
Working in rounds keeps the circle even. If you fill one side completely before starting the other, the two halves rarely match.
- Outer round. Wire the large cones to the outermost ring of the frame with their tips pointing outward. Set them side by side so the scales interlock a little.
- Inner round. Wire the medium cones to the innermost ring with their tips pointing inward, toward the hole. Keep the hole roughly round as you go.
- Top layer. Fill the band between the two rounds with small and leftover medium cones, set upright or at a slant, wired to the middle rings or glued where no wire will reach.
- Lock with glue. Add a dot of hot glue wherever two cones touch and one still wobbles. Hold them together until the glue is firm.
Watch out
Hot glue and the gun tip burn, and glue runs between cone scales onto fingers faster than you expect. Wear gloves, and press cones together with a tool or a scrap of card.
Checking the Hold
Before you add any decoration, stand the wreath upright and give it a gentle shake over the table. Any cone that droops or turns needs its tail tightened or a second wire. Turn the wreath over as well, and bend down every wire end on the back.
If Something Goes Wrong
- A cone spins on its wire. The loop is sitting too high. Push it down into the lowest row of scales and twist again.
- Frame shows from the front. Glue small cones into the gaps, or tuck in a little moss.
- The wreath hangs crooked. One side carries heavier cones. Move the hanging loop a little toward the heavy side, or swap two large cones across the ring.
- Cones start closing. They have taken up moisture. Move the wreath somewhere drier and they should open again as they dry.
Hanging and Displaying
Twist a doubled length of sturdy wire around two rings of the frame at the top to make a hanging loop, so the weight is spread over more than one wire. Weigh the finished wreath on a kitchen or bathroom scale and compare it with the weight rating printed by the maker of your hook or hanger. Follow their surface instructions too.
A covered door or an indoor wall is the kindest spot. Rain and damp air make cones close and can encourage mold, and strong sun bleaches them. Keep the wreath away from candles, fireplaces, heaters and bulbs, because dry cones and sap burn readily, and keep small loose cones away from young children and pets.
Variations
A wired ribbon bow at the bottom gives a plain cone wreath a clear focal point. Sprigs of greenery tucked between the cones soften the outline: see the fresh evergreen wreath bundled onto a wire frame for how to prepare the tips. If you would rather use a few cones as accents than build a whole ring of them, the winter wreath with faux evergreen, pinecones and berries groups them into two clusters.
Tip
Mix cones from two kinds of tree if you can. Long narrow cones and short round ones together give the surface more texture than one type alone.
Frequently asked questions
Why wire pinecones when hot glue is quicker?
Glue has little to grip on a smooth, rounded cone and can let go when the wreath is moved or the cones shift as they take up moisture. A wire looped inside the lowest scales holds the cone mechanically and lets you reposition it. Glue is then used only to stop neighboring cones from wobbling.
Do pinecones need to be open before they go on the wreath?
Yes. Closed or damp cones keep opening as they dry, which loosens the wire and pushes neighboring cones out of place. Leave gathered cones in a dry, airy spot until the scales are spread and the cones feel dry, or buy cones that are already open.
How should a heavy pinecone wreath be hung?
Make the hanging loop from sturdy doubled wire twisted around two rings of the frame. Weigh the finished wreath and compare it with the weight rating given by the maker of your hook or hanger, and follow their instructions for the surface.