Moss Wreath: Covering a Base with Sheet Moss
Tear sheet moss into palm-size pieces, pin them over a foam or straw ring with overlapping edges, and bind everything with clear thread.

Tutorial at a glance
Materials
- 10 in (25 cm) foam ring or straw ring
- Preserved or dried sheet moss
- Floral pins
- Clear thread or fine green wire
- Hot glue gun for patching (optional)
- Narrow ribbon for the hanging loop
Sheet moss comes in thin, flexible mats that can be torn by hand and laid over a ring like patches of fabric, which makes a moss wreath one of the gentler natural projects to start with. There is no arranging to plan. The work is simply covering a base evenly and holding the covering in place.
This tutorial covers a 10 in (25 cm) foam ring. Moss adds only a little thickness, so the finished wreath is about 11 in (28 cm) across. A straw ring works the same way and is noted where the method differs. Expect crumbs: moss sheds as you handle it, so cover the table before you open the bag.
What You Need
- A 10 in (25 cm) foam ring, or a straw ring of the same size
- Preserved or dried sheet moss, enough to cover roughly twice the visible surface of the ring
- Floral pins (U-shaped pins)
- Clear thread or fine green wire on a spool
- A hot glue gun for patching, optional
- Scissors, and gloves if your skin is sensitive to dust or dye
- Narrow ribbon for a hanging loop
- Paper or an old sheet to cover the table
Buy moss from a craft or floral supplier. Do not strip moss from woods, walls or parks: it grows slowly and other living things depend on it. Preserved moss is often dyed, and the dye can rub off on hands and pale surfaces, so check the package notes and wash your hands afterward.
Foam or Straw Base
Either base suits this project because both are thick, rounded and take a pin. The differences are in how the pin holds and what shows if the moss is thin. For a wider look at the options, see the guide that compares wire, grapevine, foam, straw and hoop bases.
| Base | How pins hold | If moss is thin | Note |
|---|---|---|---|
| Foam ring | Easily, push in at a slant | Pale foam shows | Light, smooth surface |
| Straw ring | Firmly, needs more pressure | Straw blends in | Heavier, sheds bits |
If your foam ring is white or very pale, wrapping it first in green or brown ribbon makes small gaps far less visible.
Preparing the Moss
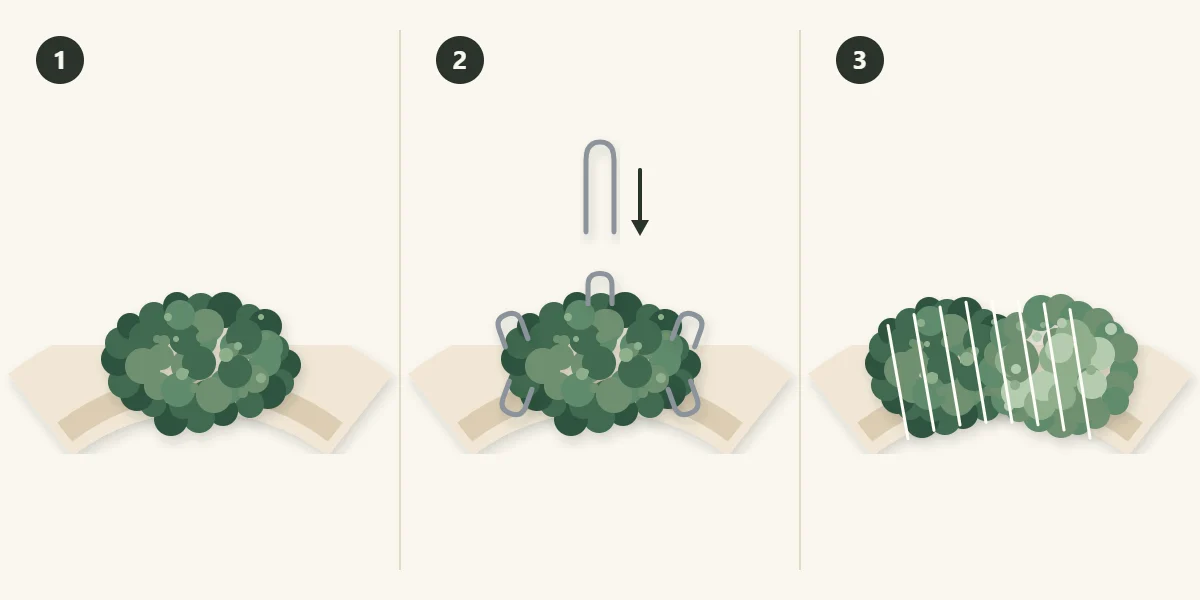
Unfold the sheets and shake them gently over the covered table to drop loose soil and crumbs. Tear the moss into pieces about the size of your palm. Tear, do not cut: a torn edge is thin and feathery and blends into the next piece, while a scissor cut leaves a straight line that shows as a seam.
Set aside the small scraps in a separate pile. They are the patching material for the end.
Pinning and Overlapping the Moss
Tie the thread or wire around the ring and knot it at the back before you begin, and leave the spool attached.
- Lay a piece on the ring. Drape a piece of moss over the front of the ring, green side up, and smooth it down over the inner and outer edges so it curves around toward the back.
- Pin the edges. Push floral pins in along the edges of the piece, angled slightly so they do not slide straight back out. Two to four pins per piece is usually enough. Press the moss fibers over each pin head to hide it.
- Overlap and wrap. Lay the next piece so it overlaps the edge of the first, pin it, then wind the thread around both pieces and the ring a few times, spacing the wraps about 1 in (2.5 cm) apart.
Carry on around the ring in the same order: lay, pin, overlap, wrap. Pull the thread just firmly enough to settle into the moss and vanish. Pulled too hard, it cuts grooves and gives the ring a segmented look. The back can stay bare or thinly covered, since it sits against the wall. When you reach the start, overlap the first piece, wrap a few extra turns, and knot the thread at the back.
Patching Thin Spots
Hold the wreath at arm’s length and turn it slowly. Look for pale base showing through, visible pin heads and flat patches. Fix each one with a scrap from the patching pile, held with a pin or a small dot of hot glue pressed down with a tool, never a fingertip, because hot glue and the gun tip burn.
Pins and glue each have their place on foam and straw, and the guide to attaching materials with wire, glue, picks and pins sets out when to choose which.
Watch out
Floral pins are sharp at both points and easy to lose in a pile of moss. Keep them in a dish, count what is left over, and keep pins and loose moss away from young children and pets.
Plain or With One Accent
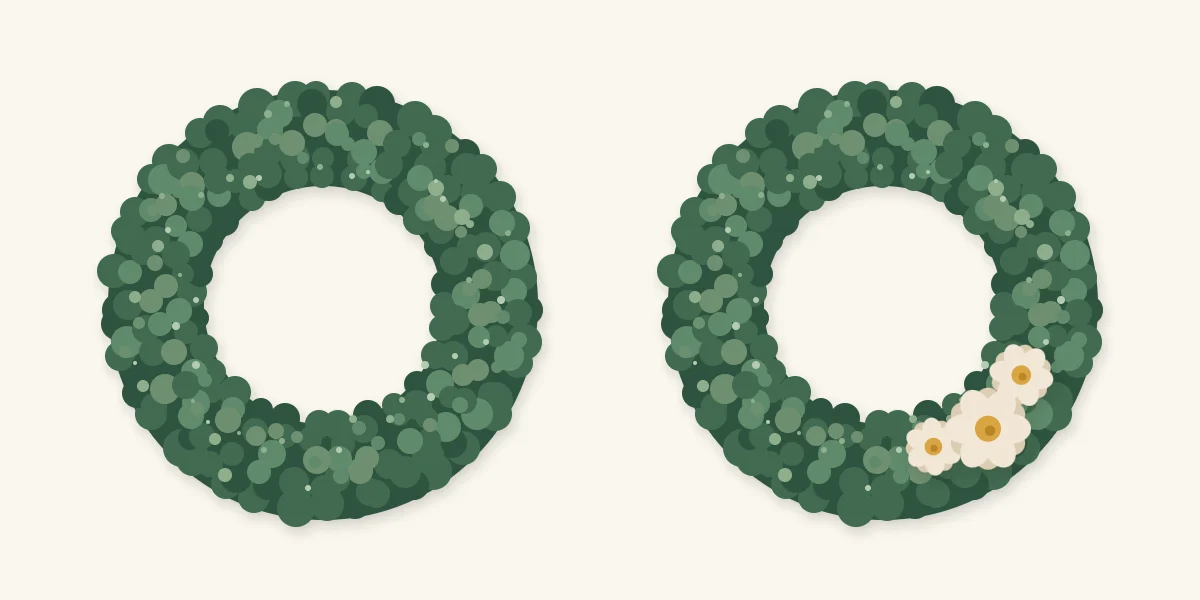
A moss wreath left completely plain has a calm, even look that suits a wall with other things on it. If you want a focal point, keep it to a single small accent in one spot, for example three small cream paper flowers grouped at the lower right. Several scattered pieces make the surface look busy.
The same restraint is the idea behind the minimalist hoop wreath with an asymmetrical spray of greenery.
Common Problems
- Pins back out of the foam. They went in straight. Reinsert at a slant, or add a dot of glue on the pin legs.
- Thread shows. It is sitting on top of the fibers. Tease the moss over it with a fingertip or a pin.
- Seams are visible. Edges were cut or butted together. Lay a torn scrap across the seam.
Hanging the Finished Wreath
Tie a loop of narrow ribbon around the top of the ring, or pin a ribbon loop to the back with two floral pins set at opposite slants. Hang it from a small hook rated by its maker for the wreath’s weight, following their surface instructions.
Moss wreaths belong indoors. Damp makes preserved moss limp and can lift dye onto a wall or door, and direct sun changes the color, sometimes quickly. Choose a dry wall out of strong light, well away from candles, fireplaces, heaters and bulbs.
Tip
Save a small bag of leftover scraps. If a patch thins or gets knocked later, you can pin on a matching piece from the same batch.
Frequently asked questions
Should sheet moss be glued or pinned to the wreath base?
Pins plus a wrap of clear thread are the easier choice on foam and straw, because pieces can be lifted and moved while you work. Hot glue is useful for small patches at the end. Many makers use both: pins and thread for the main cover, glue for scraps.
Can moss for a wreath be collected outdoors?
It is better to buy preserved or dried sheet moss from a craft or floral supplier. Wild moss grows slowly and shelters other living things, and stripping it damages the place it came from. Bought sheet moss is also cleaner and more even in thickness.
Where should a moss wreath hang?
Indoors on a dry wall, out of direct sun. Damp can make preserved moss limp and may transfer dye to the surface behind it, and strong light changes the color. Keep it away from candles, heaters and other heat sources.

