Felt Flower Wreath: Rolled Roses and Leaves on a Hoop
Cut felt circles into spirals, roll them into roses and glue a small cluster of flowers and leaves onto a wooden hoop with a felt backing piece.
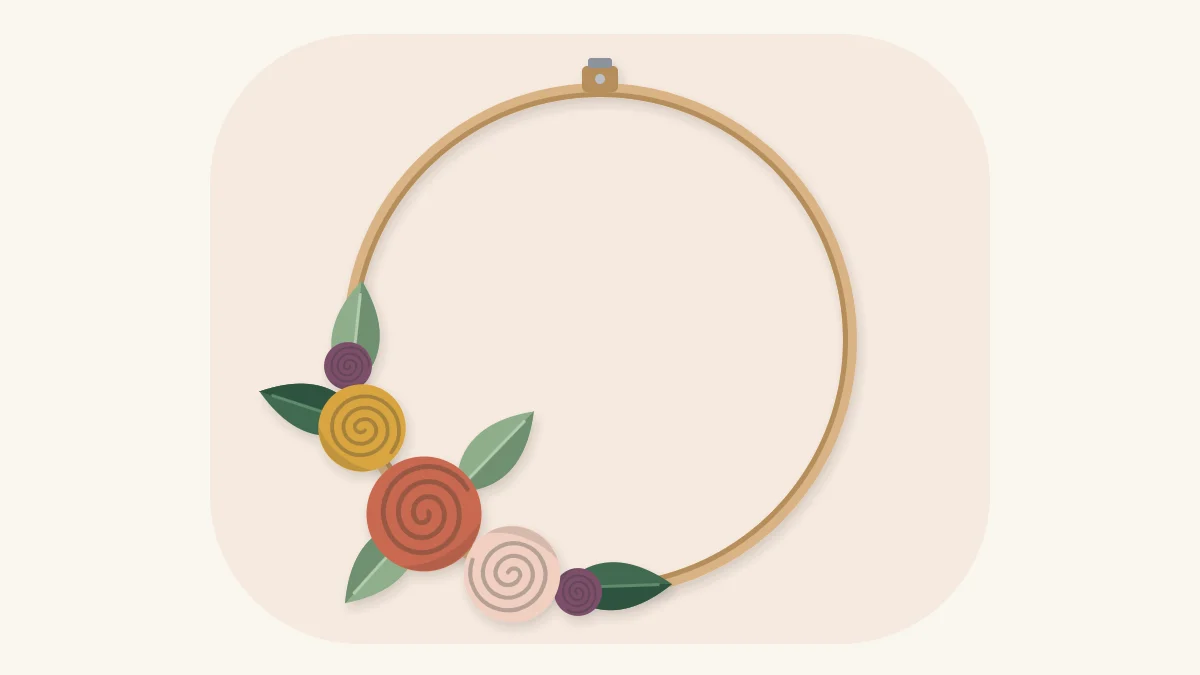
Tutorial at a glance
Materials
- Wooden hoop, about 10 in (25 cm)
- Craft felt in three flower colors, one bud color and two greens
- Sharp scissors
- Glue gun and glue sticks
- Pencil or chalk and a round object to trace
- Ribbon or twine for hanging
This felt flower wreath is a bare wooden hoop with one small cluster of rolled felt roses and leaves on its lower left. Each rose starts as a circle of felt cut into a spiral and rolled up, so there is no stitching and no pattern to print. A glue gun holds everything together.
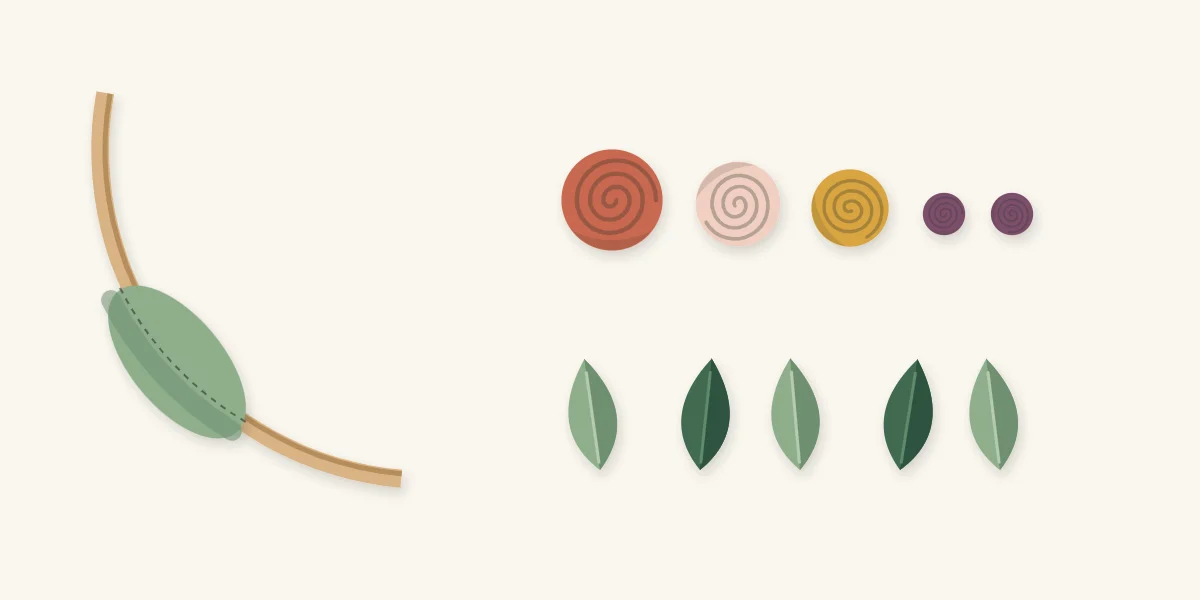
Because the hoop stays mostly empty, a handful of flowers is enough: three roses, two small buds and five leaves. That keeps the project small and puts the attention on getting each rose tidy.
What You Need
- A wooden hoop about 10 in (25 cm) across, such as the inner ring of an embroidery hoop
- Felt in three flower colors, one bud color and two greens
- Sharp scissors
- A glue gun and glue sticks
- A pencil or chalk, and a cup or jar lid to trace around
- Ribbon or twine for hanging
Thin, firm craft felt rolls most easily. Thick or very soft felt makes bulky roses that are hard to keep tight, so cut one test spiral before cutting all of them.
| Piece | Cut from | How many |
|---|---|---|
| Rose | Circle about 4 in (10 cm) across | 3 |
| Bud | Circle about 2.5 in (6.5 cm) across | 2 |
| Leaf | Pointed oval about 2.5 in (6.5 cm) long | 5 |
| Backing | Oval about 4 x 3 in (10 x 7.5 cm) | 1 |
How to Roll a Felt Rose
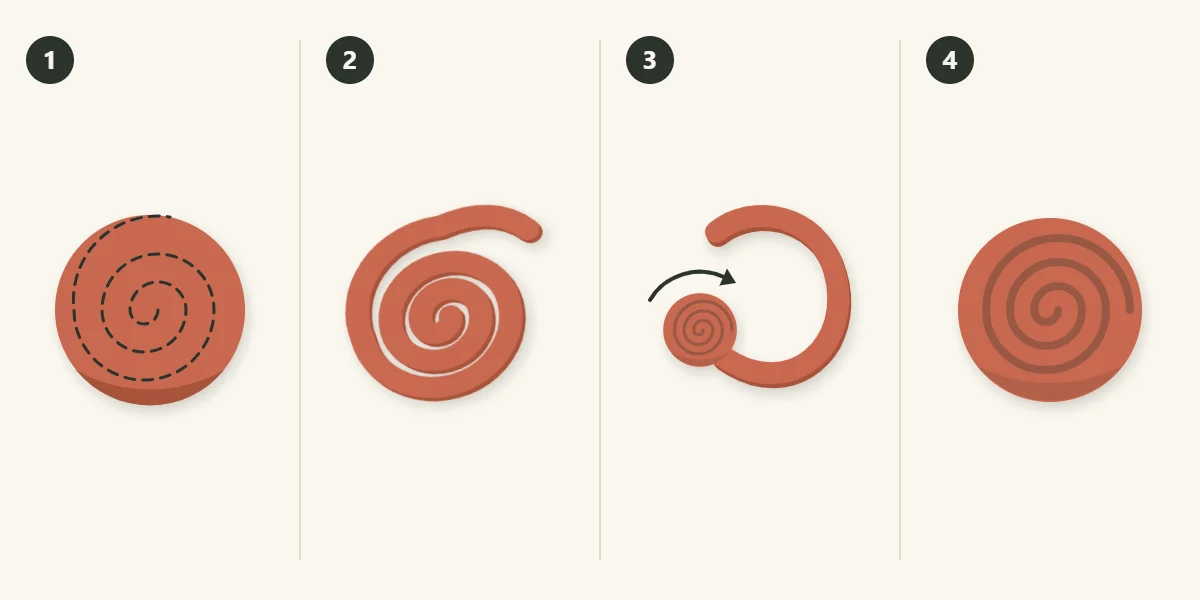
- Mark the spiral. Trace a circle on the felt and cut it out. Draw a spiral from the outer edge to the center, keeping the strip about 0.5 in (1.3 cm) wide all the way around. It will make roughly three turns and end in a small round tab at the center.
- Cut along the line. Cut in one continuous pass, turning the felt, not the scissors. A slightly wavy cut is fine and gives the petals a softer edge.
- Roll from the outer end. Start at the outside tip of the strip and roll it tightly around itself for the first two turns to form the center of the rose. Keep the bottom edge level and let the top edge flare. Add a small dot of glue to the bottom edge every half turn, and loosen the roll slightly as it grows so the outer petals open.
- Close the base. When you reach the end, the round center tab is left over. Put glue on it and fold it up under the rose like a lid. Press with a scrap of felt until the glue is firm.
Rolling from the outer end matters. The outside of the spiral is the longest, straightest part, so it makes a neat tight center, and the tab from the middle of the circle ends up as a flat base to glue onto.
Buds are made the same way from the smaller circles. With fewer turns they stay tight and closed, which gives the cluster a second flower size.
Watch out
Glue-gun tips and fresh glue burn, and hot glue can seep through felt. Use small dots, hold the rose by its sides and never press on a glued spot with a bare fingertip.
Cutting and Shaping the Leaves
Cut five pointed ovals, some in each green. Fold one end of each leaf in half lengthwise, put a dot of glue inside the fold and pinch it shut. The pinch makes the leaf cup slightly and gives it a narrow base that tucks under a flower. Flat leaves look like cut-outs; pinched ones look like leaves.
Making the Backing Piece
Felt flowers have very little to hold onto on a thin, round hoop. A backing piece solves that. Cut an oval of green felt, place it under the hoop at the lower left with its long side following the curve, and fold it around the wood so the two halves meet. Glue it to the hoop and to itself. You now have a small flat pad that grips the hoop and gives every flower and leaf a surface to stick to.
Before gluing anything else, lay out the pieces beside the hoop in the order they will go on: three roses, two buds, five leaves. Decide which rose is the center of the cluster. For more on why a group like this looks settled at the lower left, read the guide to balanced wreath composition.
Assembling the Cluster
- Glue the leaves first. Fan the five leaves out from the backing, pinched ends toward its middle and tips pointing outward along the hoop in both directions.
- Add the three roses. Glue the center rose onto the middle of the backing, over the leaf bases. Set the other two close against it, one on each side, so they touch.
- Tuck in the buds. Place the two buds at the outer ends of the cluster where a rose meets the leaves.
- Check from the front. Hold the hoop upright. No backing should show. If it does, shift a leaf or add one more.
Leaves go on first because their bases are the untidy part, and the flowers sit on top to hide them.
Common Problems
- The rose unrolls. There was too little glue on the bottom edge. Reroll and glue at shorter intervals.
- The rose is cone-shaped. The bottom edge crept upward while rolling. Keep the base flat against the table as you turn.
- Glue strings everywhere. Let them cool, then pull them off or snip them. They lift cleanly from felt.
- The cluster rotates on the hoop. The backing was glued only to itself. Add glue between the felt and the wood.
Hanging and Displaying It
Loop a ribbon or a length of twine over the top of the hoop and hang it from a small hook or nail. The finished wreath stays about 10 in (25 cm) across, since only the leaf tips reach past the hoop. Felt collects dust and its color changes in direct sun, so this is an indoor piece for a dry wall away from strong light. Keep it clear of candles, heaters and bulbs, and out of reach of young children and pets.
Variations
Use one color in three shades for a quieter look, or swap the roses for cardstock blooms as in the paper flower wreath. If you prefer greenery to flowers on the same kind of base, the minimalist hoop wreath uses a small leafy spray in the same position.
Frequently asked questions
What size felt circle makes a rolled rose?
A circle about 4 in (10 cm) across, cut into a spiral strip about 0.5 in (1.3 cm) wide, makes a rose a little under 2 in (5 cm) wide. A smaller circle gives a tight bud. Sizes are suggestions, and the thickness of the felt changes the result, so roll one test rose first.
Why do felt flowers need a backing piece on a hoop?
A thin round hoop offers almost no flat surface for glue. A small oval of felt wrapped around the hoop and glued to itself makes a pad that grips the wood and gives the flowers and leaves something to stick to. It also hides behind the cluster.
Can rolled felt roses be made without a glue gun?
Thick craft glue or fabric glue works, but each rose has to be held or clipped until the glue is firm, so the work is slower. Follow the product label for setting. A few hand stitches through the base are another option.

