Balanced Wreath Composition: Placement, Proportion and Color
How to plan a wreath layout: full ring, crescent or cluster, where to place focal pieces, how many to use, and how to limit color.
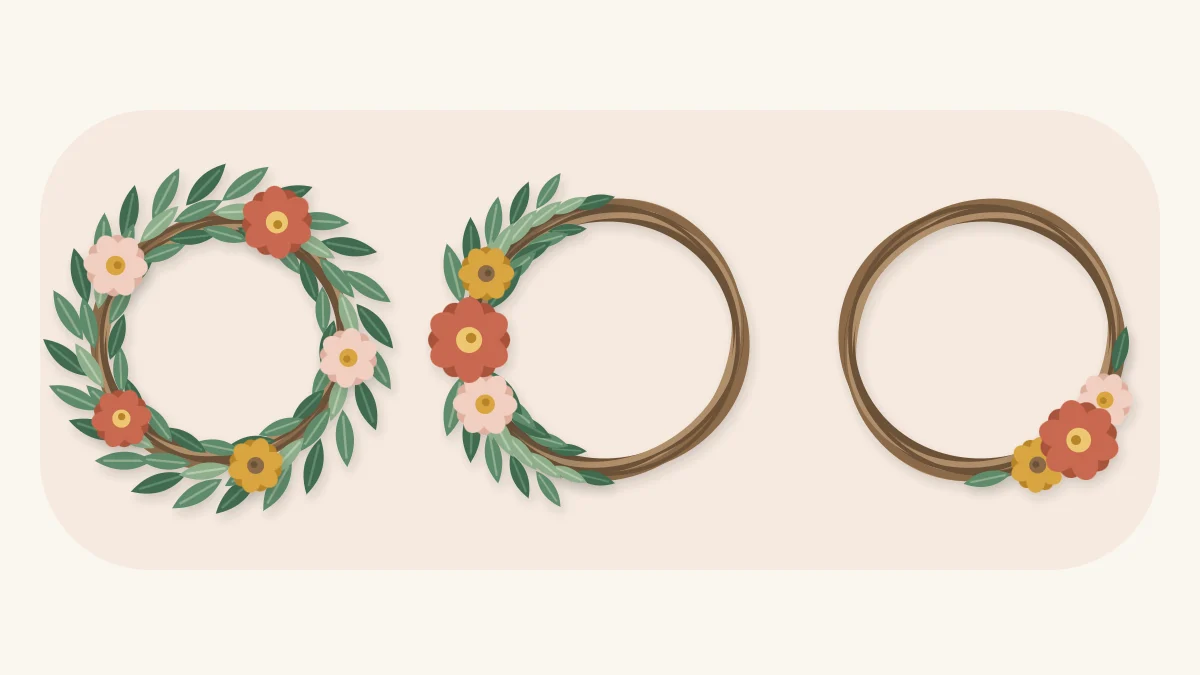
Tutorial at a glance
Wreath composition is the set of decisions about where things go: how much of the ring to cover, where the eye should land first, and how color and size are shared around the circle. Good materials placed without a plan tend to look scattered, while quite ordinary materials placed with one look deliberate.
None of this needs an art background, and the principles below apply to any base and any material.
Three Layouts to Choose From
Almost every wreath is one of three layouts. Decide which one you are making before you attach the first stem, because the layout sets how much material you need and where the focal point sits.
| Layout | Coverage | Suits |
|---|---|---|
| Full ring | The whole base, front and edges | Plain bases you want hidden, traditional doors |
| Crescent | About half the ring, tapering at both ends | Grapevine and other bases worth showing |
| Cluster or accent | A quarter of the ring or less | Hoops, moss or wrapped rings, small walls |
A full ring is the most forgiving to balance, because material is spread evenly, but it uses the most. The step-by-step faux flower wreath on a foam base is a full-ring example. A crescent leaves part of the base bare on purpose and depends on a clean taper, as in the crescent grapevine wreath with faux florals. A cluster is the smallest and the least forgiving: with so few pieces, each one is noticed.
Visual Weight and Balance
Visual weight is how strongly a piece pulls the eye. Large, dark, bright or densely textured pieces are heavy. Small, pale, fine pieces are light. A wreath looks balanced when the heavy pieces are answered by something elsewhere on the ring, even though nothing has to mirror exactly.
In a full ring, balance comes from even spacing. In a crescent or cluster, the bare section of the base does the answering: the empty space is part of the design, so resist filling it. Adding a second, smaller cluster opposite the first only gives two competing focal points.
The Clock-Face Method
Picture the ring as a clock face. It gives you a simple way to name positions and to space focal pieces evenly without measuring.
For a full ring with three focal flowers, place them at two, six and ten on the clock. Joined by imaginary lines, the three make an even triangle, which reads as stable from any distance. With five focal pieces, think of a five-pointed star. For a crescent on the left side, the tips sit near eleven and six and the focal point falls around eight. For a cluster, lower left around seven or eight, or lower right around four or five, usually looks more settled than dead center at the bottom.
Tip
Lay focal pieces on the base loose, or hold them with a single twist of wire, and check the spacing before anything is fixed for good.

Odd Numbers and Three Sizes of Material
Groups of three or five focal pieces tend to look more natural than two or four. Even numbers pair off, and the eye starts comparing the pairs. An odd group has a middle, which gives the arrangement a center.
Size matters as much as number. Sort your material into three sizes before you start:
- Focal: the largest pieces, used sparingly. One large flower can be enough for a cluster.
- Secondary: medium pieces, roughly three for every focal piece, that support the focal point and carry its color outward.
- Filler: small sprigs, leaves and buds that close gaps, hide stems and wire, and soften the outline.
Attach them in that order, large to small. If filler goes on first there is no room left for the pieces that matter most, and a wreath built only from medium material has nowhere for the eye to rest.

Direction of Flow
Stems and leaves have a direction, and the wreath looks calmer when they agree. On a full ring, point everything the same way around the circle, either clockwise or counterclockwise, and keep to it. On a crescent or cluster, let stems radiate from the focal point toward both tips, so the eye starts at the center and travels outward.
Mixed directions are a usual reason a wreath looks untidy even when the colors and spacing are right.
Limiting the Palette
Two or three colors plus green is a dependable limit. Choose one main color for the focal pieces, a second that is lighter or darker, and at most a small amount of a third as an accent. Green and the brown of a vine base act as neutrals and do not count.
Repeat each color in at least three places so that none of them looks like an accident. A ribbon counts as a color too, and a bow is a heavy piece in its own right. If you plan to add one, the instructions for making a simple layered loop bow include notes on scaling it to the wreath.
Depth by Layering
A wreath with every piece at the same height looks flat. Build depth in three levels: greenery lying close to the base, secondary pieces sitting a little higher, and focal pieces standing proud of the rest. Let a few leaves or sprigs break the outer and inner edges so the outline is soft, and tuck some filler deeper than the flowers to create shadow between them.
How to Check Your Work
A wreath on a table looks different from one on a wall, so check it the way it will be seen.
- Hang it up. Put it on a hook or prop it upright. Gravity shifts stems, and a lopsided wreath shows at once.
- Step back. Look from across the room, the distance it will normally be viewed from.
- Squint. Detail blurs and only the masses of light and dark remain, which shows whether weight is balanced.
- Photograph it in black and white. With color removed, gaps, clumps and a missing focal point are easy to spot.
Watch out
Do the checks before the final gluing. Wired or tucked pieces can be moved, but a glued flower usually takes part of the base or its own petals with it when pulled off.
When something looks wrong and you cannot name it, remove a piece instead of adding one. Overfilling is a more common problem than leaving too much space.
Frequently asked questions
Where should the focal point go on a wreath?
On a full ring, space three focal pieces at two, six and ten on an imaginary clock face. On a crescent, set the focal point slightly off the middle of the decorated section. For a small cluster, the lower left or lower right usually looks more settled than the exact bottom center.
How many colors should a wreath have?
Two or three colors plus green is a dependable limit. Pick a main color for the focal pieces, a lighter or darker second color, and only a little of a third. Repeat each color in at least three places so it looks intended, and count the ribbon as one of the colors.
Why do odd numbers of flowers look better?
Even numbers tend to pair off, and the eye compares the pairs. A group of three or five has a middle piece, which gives the arrangement a natural center. It is a guideline, not a law, but it is a useful default for focal pieces.